
Thursday, 4 July 2019
Saturday, 1 June 2019

Sunday, 26 May 2019


Friday, 3 May 2019
Set of masculine cards + packaging
Here is my final card challange of Level 1
in the AECP course: a set of masculine cards (6-12) plus
packaging. I decided to create this set without any
flowers.
So let's start.
These three cards are based on the following Altenew
courses:
Easy Ink Blending Techniques (I love blending; this way I can create my own design on the paper), Easy Die Cutting Techniques (I also adore die-cutting) and For the Guys (these cards are to be masculine).
Easy Ink Blending Techniques (I love blending; this way I can create my own design on the paper), Easy Die Cutting Techniques (I also adore die-cutting) and For the Guys (these cards are to be masculine).
Firstly, I blended two white A6 cardstocks using 3 inks (the seahorse cards). When they dried, I sprinkled them with water and dried the drops of water on them.It gave me the white drops on the panel.

I painted the panel of the football card using a brayer and mist.

When the three cards were dry, I embossed them with the dies (seahorse and
stars). I die-cut three seahorses (two white and one
turquoise) and the football set, which I ink-blended in
black.

I stamped the sentiments, then one was
die-cut, the other was punched and the third one was
trimmed.I sticked the panels with the seahorses onto
the white card base, glued the crystal dots / sequins.
The football card panel and the sentiments
were placed on a thick cardboard (instead of foam tape). On the football card I used the green washi
tape and the cardboard to achieve two layers.
Tips: use some thick cardboard instead of foam
tape (which is always at home and you don't have
to buy it); after embossing the dies you can run the
panel through your cutting/embossing machine to
make it flat.

The final result is below.

Supplies: Tim Holtz Distress Ink
(evergreen bough, peacock feathers, faded jeans), white cardstock, thick cardstock, blending
tool, dies (Sweet Dixie Football and Boot, Seahorse
and others), sentiments (silicone stamps), washi tape,
sequins, crystal dots, glue.
This greetings-from-my-happy-place card is
based on Seasonal Scene Building, Easy Ink Blending Techniques and All About Layering (the clouds look like
3D ones).
I ink-blended the scene using masking. I stamped the grass / herbage, sentiment and
birds, and finally - layered clouds. I placed the sentiment as the element of the
scenery, not on the cardstock to make the onlooker
study the picture. To embellish the picture / scene I embossed
the frame directly on the card base.

Here is the 6 x 6 card.
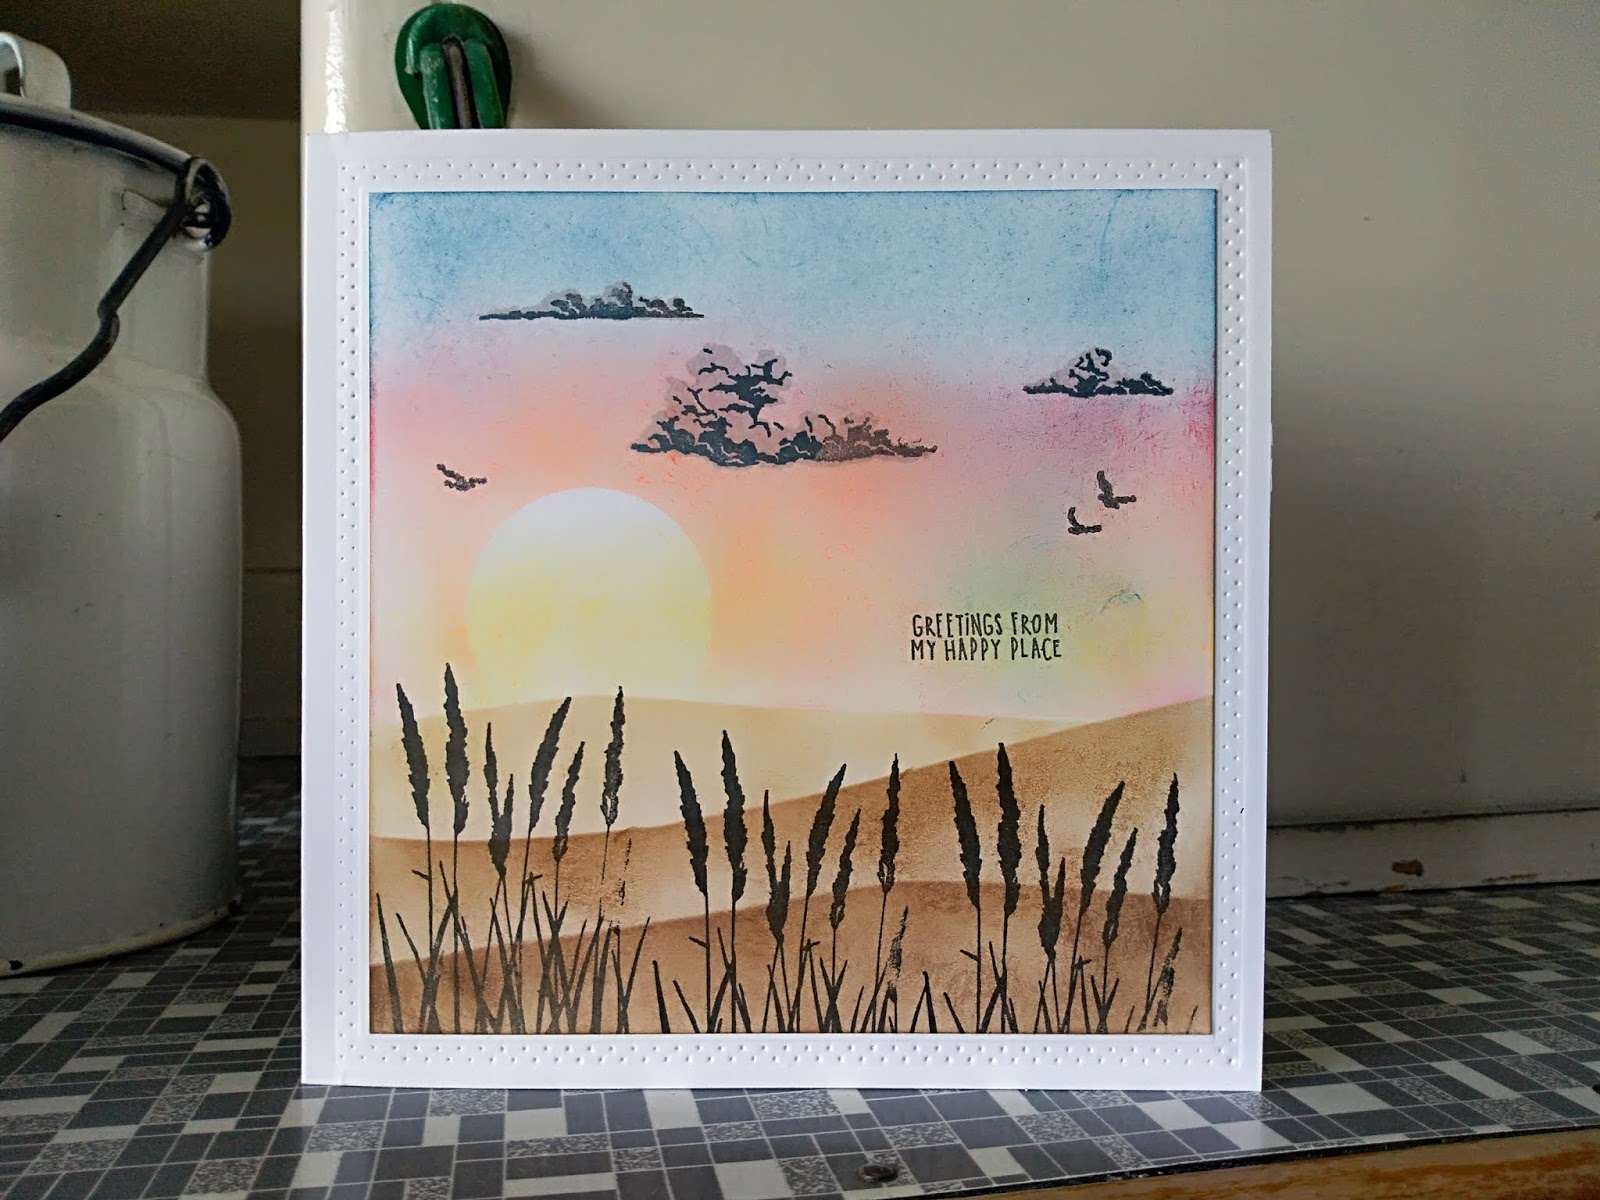
Supplies: Latarnia Morska inks, silicone
stamps, square die, blending tool, white cardstock.
My next two cards were inspired by two Altenew courses: For the Guys and Clean and Simple Boutique
Cards. Cards for the guys used to be a problem, but after the For-the-Guys course I feel full
of ideas. Clean and simple cards are just classy and
stylish.
So I stamped the striped silicone onto the
white cardstock (one square 4 1/2 x 4 1/2, the other one -
A6). For the square ciesz-się-życiem card (=
enjoy-your-life), I made a cut (1/3 of the length) and used the scoring board to form the
collar. I handmade a tie template, cut the tie,
stamped the dots, cut the pocket and ink-blended them in
yellow. I glued the panel, the tie and the pocket. I added 3D squares under the collar to make
it spatial. For the just-because card, I stamped a
steampunk border at the bottom, stamped the sentiment and the lightbulbs, cut
them out and glued them onto the cardboard to give
dimention.

Here are the cards:

Supplies: Altenew Pinstripes Stamp Set, Archival Ink Potting Soil,
Nellie's yellow pigment ink, silicone stamps, white and craft cardstock.
The najlepsze-życzenia (=Best wishes) card is
clean and simple
(Clean and Simple Boutique Cards) with metallic details (Let It Shine, Celebration - Stencil Techniques) and smoky ink-blended background (Easy Ink
Blending Techniques).
I ink-blended an A6 panel, put the embossing
paste through the stencil, stamped the sentiment and glued it
dimentionally on the white card base.

Here are the cards:

My next project - the Hello card -
contains 'natural' paint.
One day I kept a piece of beetroot covered by
a cup (in the kitchen).
When I lifted the cup, the edge was dark red. I liked the color and I stamped the circles
on the white cardstock (the dark red ones).
A few day later I added the light brown
circles using the same cup
and some coffee. Then I stamped the sprockets, dots and the
sentiment. Finally, I used six layers of thick cardstock
to build up the shaker (Seasonal Scene Building), put confetti and some real metal
washers inside (from the local DIY store) and that's all.

Here is the card:

Supplies: Altenew Pinstripes Stamp Set, gears
stamp, circle dies, metal washers, confetti, white cardstock, glue.
My
last card - welcome to the neighbourhood - is my favourite one.
I prepared a dark grey base (11,5 cm x 29,7
cm), scored it to have the 11,5 cm x 11,5 cm
front.
I die-cut two 10,8 cm square panels, one
external - light grey and one internal - silver. I stamped a wall on the external panel, the
sentiment on the white cardstock, and sticked a cloud on the internal one. After gluing both panels, I die-cut a square
in the front. Then following Jennifer Rzasa's instructions in lesson 2 Artistic Techniques (For The Guys) I created a
starry-night background panel (ink-blending technique).
Having mixed some white acrylic paint and
water, I splattered "the stars" on the
dark blended paper. I stamped the town/city houses twice, one -
on the ink-blended panel and for the other one I flipped the panel
over. I cut out both pictures and sticked them: the silhouette one inside the project and the houses outside on the front panel. The die-cut lamp post on the right is also
ink-blended.
Finally, I glued the sentiment. For this card I handmade a grey envelope
using my scoring board.

Here is the card:

Supplies: Amsterdam white acrylic paint, pepermania black ink, stamps,
dies, cardstock (grey, dark grey, silver), blending tool.
Packaging - kind of a TOOLBOX
I took two empty cartons of muffins and cut
parts of them to prepare a box for tools, I mean for cards. The photos below show all the instructions:


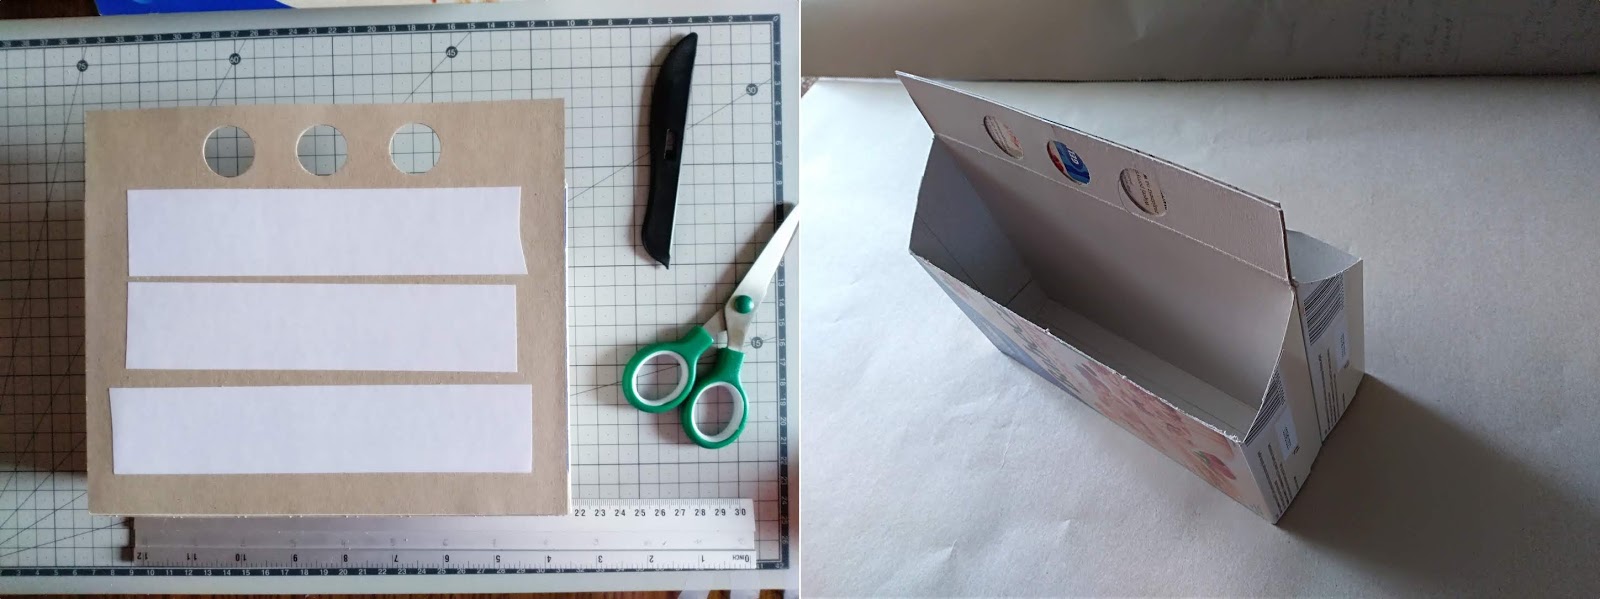


Here is the cardbox (21 cm x 10 cm x 18 cm) with my cards inside.

The gift is ready.
Saturday, 6 April 2019
Wiosna na żółto / Yellow Spring
Na warsztatach online z Olgą Bielską zrobiłam te śliczne kartki.
Papiery - LaseroweLove.pl - kolekcja Yellow Spring.


Friday, 5 April 2019
Inking Techniques
In this project in the AECP course:
Irresistible Inking Techniques by Sara Naumann
I used a stamp block to create the background.
I put some ink on the acrylic block, sprayed some water
and pressed it down on the white cardstock.
Next I stamped the flower 4 times to achieve the shadow effect.
The stamped sentiment means "Let your dreams come true".
I also hand-drawn the frame around to give the project a smart look.


Supplies:
Altenew Meadow Flower Stam Set, sentiment,
Tim Holtz Distress Ink - Seedless Preserves,
white cardstock, glue.
Spełnienia marzeń / Let your dreams come true
This project was inspired by All About Layering 2 course (NicolePicandura) in the AECP.
I stamped the second and third layers of the rose using the same ink colour
and the second and third layers of the leaves using different colours.
I did not use the first layer - the outline.
I splattered two colours of ink,
stamped the sentiment and I placed it on the foam tape to add dimention.
As the final touch - I added two coordinating sequins in different colours and sizes.
Simple and clean.


Supplies:
Marianne Design Layered Stamps (TC0855),
Memento Dye Ink (Lulu Lavender, Olive Grove, Bamboo Leaves),
glue, foam tape, sequins.
Najlepsze życzenia / Best wishes
This time I prepared a project inspired by Laurel Beard in my next AECP course:
Celebration - Stencil Techniques.
To add texture and dimention I have used a stencil with triangle patterns on the white cardstock.
I have also created my own colour tinting the pearl stencil paste with the distress ink.
I added some foam tape to place the panel on the white base of the card.
The stamped sentiment is in Polish and it means "Best Wishes".
The final touch - the flower cames from Altenew Hibiscus Bouquet Stamp Set.


Supplies:
stencil, Pentart pearl stencil paste (Ice Flower),
Tim Holtz Distress Ink - Evergreen Bough, Peacock Feathers
and Punice Stone,
Altenew Hibiscus Bouquet Stamp Set,
white cardstock, sentiment, foam tape, Pentart Glue for Hobby.
Thursday, 4 April 2019
Wiele radości / Lots of joy
The next course which I have followed in the AECP is For the Guys by Jennifer Rzasa.
I have decided to stamp geometric patterns to create a masculine card.
I used a stamp with diamonds + different inks on the white cardstock.
Rubbing the stamped panel I achieved the image which is blurred a bit.
I die-cut a line like a winding road and separated the panel in the middle.
I also roller-inked the stitches between the panels, then placed it on the yellow cardstock.
The die-cut sentiment says "Lots of Joy".
The diamond on the foam tape is bigger than the stamped diamonds
and it adds the 3D element on the card.


Supplies:
white cardstock, yellow cardstock, different (old) ink pads,
diamonds stamp, roller stamp, metal dies, glue, foam tape.
Sunday, 13 January 2019


Subscribe to:
Posts (Atom)
-
 Here is my final card challange of Level 1 in the AECP course: a set of masculine cards (6-12) plus packaging. I decided to create this...
 -
 The next course which I have followed in the AECP is For the Guys by Jennifer Rzasa. I have decided to stamp geometric patterns to crea...
 -
 Today I would like to share a project inspired by Yana Smakula in my next AECP course - Easy Die Cutting Techniques. In my pro...